Note: These materials are offered only in English as supplementary examples for a deeper dive into
Contour Cut and Half Cut Workflow
Contour cuts are useful for stickers, labels, wall art, signs, logos, etc. has two methods for creating a contour cut around images and objects.
Contour cuts create a cut path around image frames or around and on the inside contours of objects. They can also be merged to create a single cut path around multiple objects.
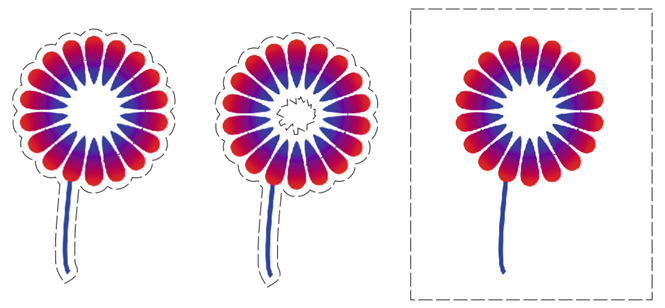

Half cuts create a contour cut around images or objects with optional peel tabs.


In :
Contour Cut
- Select an image or object.
- Go to Cut > Contour Cut.
A contour of the object is automatically applied. - If it's an object, and you also want the inside contoured, select Inside/Outside.
- If it's an image, and you want only the frame contoured, select Bitmap Frame.
- Choose cut offset and color.
- [Optional] Select corner style, set bleed, group objects, or invert bitmaps.
- [Optional] With more than one object, to create a single contour, select Merge.
To control the contour tightness, use the slider. - To close the SmartBar, double-click anywhere on the workspace.
- Select all and go to File > Print and Cut.
Half Cut
- Select an image or object.
- Go to Cut > Half Cut.
- Select a corner style and cut offset and color.
- [Optional] Select group objects.
- [Optional] Select peel tab and choose a position for the tab to be added.
- To close the SmartBar, double-click anywhere on the workspace.
- Select all,
- Go to File > Print and Cut.
In Digital Factory
From
- Select the queue set up to receive the contour cut job.
- Click the Cut Stroke Setup icon next to the job name.
- Ensure the cut stroke color matches and the cut process is enabled.
- Select a cut process. For more options, click the ellipsis.
- To change the cut line, apply a cut line transformation.
- Click Print and Cut Job or Cut Job in the toolbar.
Applying a Contour Cut in
- Select the job.
- Click Contour Cut.
- Select options in the dialog with help from the information below.
Contour Cut dialog
- Inside/outside: Used for contouring the inside of objects (such as the letter "O")
- Bitmap frame: When selected, only the rectangular bitmap frame is contoured.
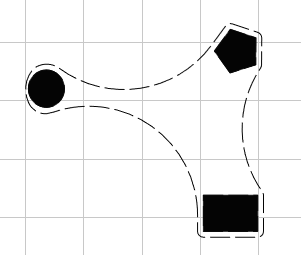
- Corner style: Point, round, or miter. If round is chosen, inside corners can also be rounded.
- Merge: With multiple objects, merge all contours into a single contour. Control the contour tightness with the slider. Corners are rounded.


Fiery family of software products
Making your machines run better
Copyright © 2026, Fiery LLC. All rights reserved. Privacy Policy.