Queue tab
The Queue tab controls apply to the current queue. Use the drop-downs to make selections about media type, size, and layouts.
Set the print quality, paper, direction, carriage width, pass delay, white passes, queue margins, etc.
Note: Options vary by device.
Click Substrate Color to set the substrate color of the queue.
Note: Ensure no jobs are selected, or the color will be set per job.
To add new media or configure added media, click the ellipsis ( )button. The Media Setup dialog appears. Depending on the media, you may see the Media Setup dialog or the Template Setup dialog.
- Enter a name, size, and margins.
To configure template media, click the ellipsis button () next to the template drop-down. The Template Setup dialog appears (unless you are using a default template). See Template Setup dialog.
In the Template properties section, enter a name and specify the dimensions, or select a sheet as a base.
In the Slot configuration section, specify the size of a slot (the expected size of a placed job).
Note: Define the alignment, scaling, and rotate settings prior to creating copies so changes are applied universally.
To adjust Queue color, click to open the Easy Color Adjustments dialog. Available options are device dependent.
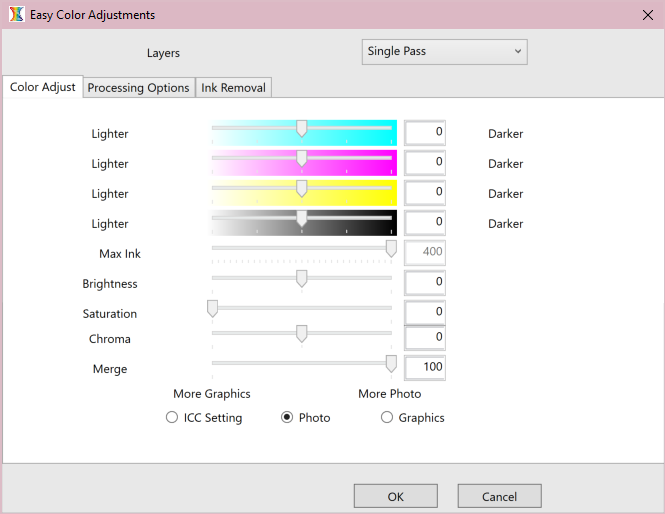
Color Adjust
- Use the sliders to control lightness and darkness for hues, ink levels, brightness, saturation, and chroma.
- Select ICC Setting, Photo, or Graphics.
- ICC Setting uses the settings within the active ICC profile.
- Photo adjusts the saturation levels of the job relative to the color adjustment. Better for jobs which require consistent saturation levels, such as photographs.
- Graphics adjusts the color as specified, without changing the saturation levels of the rest of the job. Better for jobs which require bright and vivid color such as graphics and logos.
Processing Options
- When a white channel is available, set the maximum white ink %, choke, and strength.
- Set the highlight strength and switch layers (if applicable) to set the maximum ink coverage for the underbase, the choke (to limit the spread of the primer layer), and the strength.
- When a clear channel is available, set the maximum clear ink % and spread.
Special Effects with Ink Removal
Fiery family of software products
Making your machines run better
Copyright © 2026, Fiery LLC. All rights reserved. Privacy Policy.