スロットカットパターンを使用したクリップ
You can use an existing path (HPGL .plt files) as a clipping path for a template.
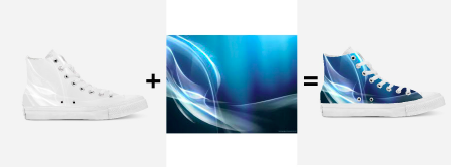
For example, clipping can create a fixed path for a shoe print.
必要なもの:
- Slot must have cut path assigned
- Job may be clipped once
- Slot ID cannot be repeated for multiple slots
To create a clipping path:
- Create clipping paths using
Note: Scale the path size in the design application before exporting. - Export the paths (HPGL .plt files) and save them in the following folder: C:\Program Name\cutpatterns.
For example: With the shoe template, you could name the clipping path "BlueShoePath_sizeX.plt".
Set up a template:
- キューを選択します。
- [キュー]タブで[テンプレート]ドロップダウンを選択し、三点リーダーボタンをクリックして編集するか、[新しいメディアの追加]をクリックします。
- テンプレートを作成または変更して、カスタムカットパターンを追加します。
For example: With the shoe template, you could name the template "Blue Shoe size X". - Set the scaling and rotation.
Note: The path is centered in the slot. - Ensure you position the slot for the clipping path using the size and position fields.
- 完了したら、[保存]をクリックします。
To clip a job:
Note: To clip on import, go to Queue > Properties > PDF Setup.
- Ensure the template media you created is selected in the Queue tab.
The clipping path should show in the preview. - ジョブをキューに追加します。
[テンプレートジョブのインポート]ダイアログが表示されます。 - インポートの項目を選択します。
- Adjust the size and position of the graphic.
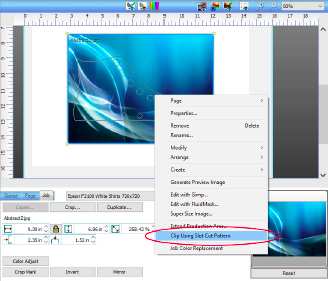
Note: Ensure you are done editing prior to clipping. - ジョブを右クリックして[スロットカットパターンを使用したクリップ]を選択するか、ジョブを選択して、[ジョブ] > [スロットカットパターンを使用したクリップ]の順に移動します。
ジョブがスロットカットパターンにクリップされます。 - Click Print.
Fiery family of software products
Making your machines run better
著作権 © 2026, Fiery LLC.全著作権所有。個人情報保護方針.