FilmMaker Interface
Los elementos siguientes componen el área de trabajo.
Controles de la barra de herramientas
De izquierda a derecha:
- Abrir: Abra el cuadro de diálogo Examinar y seleccione una imagen. El trabajo se añade a la cola actual.
- Eliminar trabajo: Borre de forma permanente el/los trabajo(s) seleccionado(s) de la cola.
- Liberar trabajo: Anule la retención de un trabajo para imprimirlo.
- Retener trabajo: Detenga el trabajo y póngalo en espera.
- Poner trabajo en cola: Envíe los datos de impresión a la cola sin enviarlos a la impresora. Haga clic con el botón derecho para acceder a opciones tales como Ver datos sin procesar.
- Trabajo de impresión
- Save As: Save the selected job as a job backup file.
- Centrar en la página: Centre el trabajo horizontal o verticalmente sobre el material.
- Centrar horizontalmente en la página: Centre el trabajo horizontalmente sobre el material.
- Center at top of page: Center the job horizontally and at the top of the page.
- Ajustar al ancho de página: Ajuste la escala del trabajo para que coincida con la anchura de la página.
- Ajustar a la altura de la página: Ajuste la escala del trabajo para que coincida con la altura de la página.
- Ajustar a la página: Ajuste la escala del trabajo para que se ajuste al tamaño de la página sin que exceda los límites.
- Eliminar errores: En el caso de que aparezca algún error, haga clic aquí para borrarlo.
- Abortar trabajos: Detenga el procesamiento del trabajo o trabajos.
Works on TCP/IP and USB devices. - Iniciar/Detener la cola: Con respecto a la cola seleccionada, procese los trabajos a medida que se reciben o detenga todos los trabajos independientemente de los ajustes de programación. El estatus se muestra en la esquina superior izquierda de la cola.
- Configurar la cola: Con respecto a la cola seleccionada, abra el cuadro de diálogo Propiedades de la cola.
- Configuración y estado de la impresora: Obtenga información de la impresora.
- Printer Readme: Opens the driver's Readme file if available. The button will highlight in red in the event a Readme file is included but has not yet been opened.
- Costes: Abra la pestaña Costes del cuadro de diálogo Propiedades de la cola.
- Buscar trabajo: Introduzca un nombre de trabajo o un código de barras para localizarlo en la cola (véase Compatibilidad con códigos de barras, Búsqueda de trabajos).
- Sustitución de colores del trabajo: Sustituya un color concreto o una gama de colores (véase Sustitución del color del trabajo).
-
Create Gang Sheet: Opens the Create Gang Sheet dialogue window (see Gang Sheets).
- Marcas de producción: Abra la pestaña de Marcas de producción de las Propiedades de la cola.
- Calibración de cámara: Haga clic para imprimir una impresión de calibración y para calibrar una cámara a fin de alinearla (véase Visual Print Positioning).
- Compass: haga clic para abrir la ayuda contextual.
Colas
Una cola consiste en un repositorio que gestiona los trabajos antes de procesarlos. Cada cola se basa en un dispositivo, modo de impresión y/o material.
Nota: Una cola puede admitir un número máximo de 2000 trabajos.

On the top left side of the  ).
).
Si necesita más información sobre la configuración de las propiedades de una cola seleccionada, consulte Propiedades de cola.

Active Job List
Under the queue tabs, the jobs are shown in a list, with reserved and completed jobs moving out to the Job Reserve List once completed.
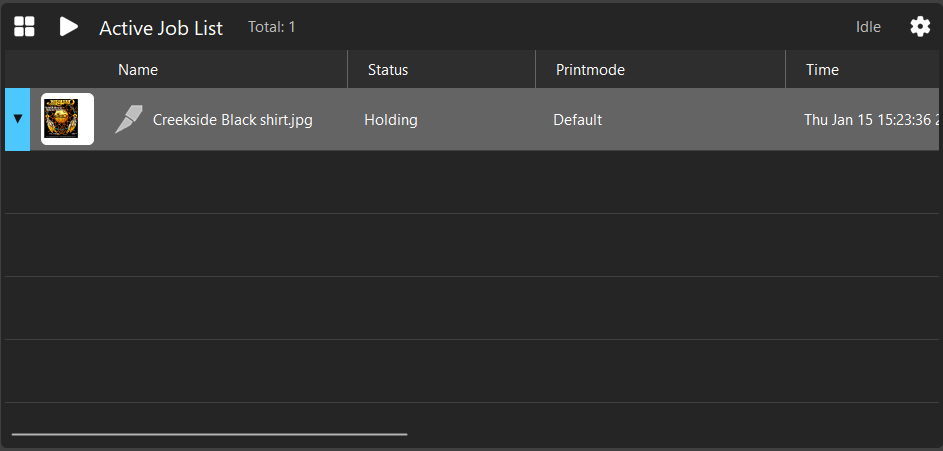
From left to right, the active job menu contains the following controls or information displays:
-
Pane Control button.
-
Run/Pause Queue toggle.
-
Total number of jobs in the active queue.
-
Queue status.
-
Active Job List settings: Open to adjust preview size or to sync headers to match the Job Reserve List.
Job Reserve List
Once jobs are processed, they are moved from the Active Job List to the Job Reserve List.
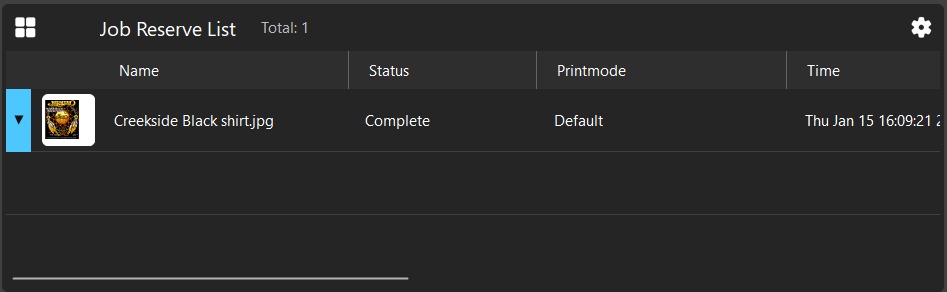
Jobs can be dragged from the Job Reserve List back into the Active Job List should the job need to be redone or extra copies made. This pane also contains:
-
Pane Control Button.
-
Total number of jobs in the reserve list
-
Job Reserve List settings: Open to adjust job preview size or to sync headers to match the Active Job List.
Administrador de previsualización
On the top right side of the
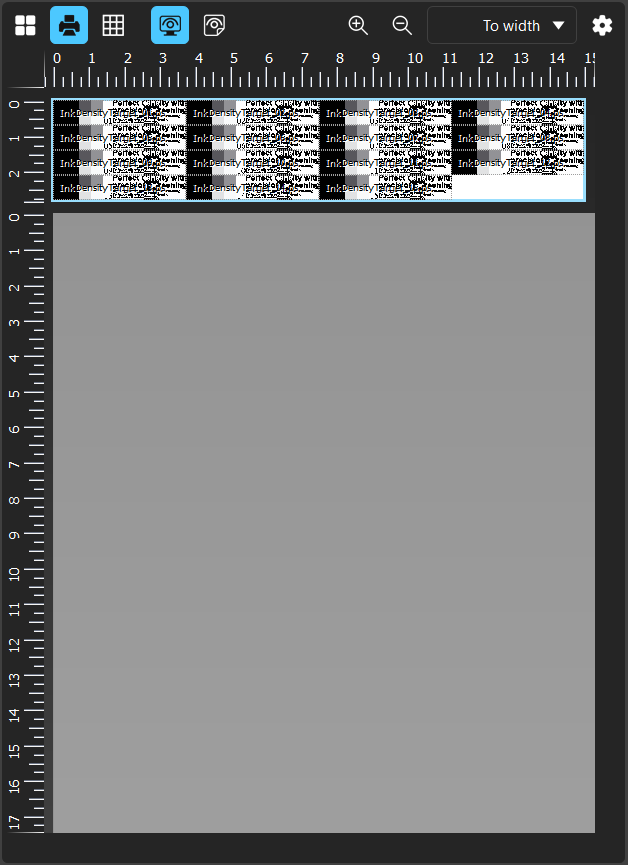
From left to right, the preview window contains the following controls:
-
Pane Control Button.
-
Toggle Print Preview.
-
Toggle grid visibility.
-
Original Preview (Showing matching screen color space).
-
Soft Proofing Preview (Preview more representative of printed output).
-
Zoom In.
-
Zoom Out.
-
Zoom Level Dropdown menu.
-
Additional Preview Settings
Preview & Page Options
The
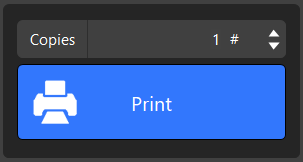
Print and Cut Buttons
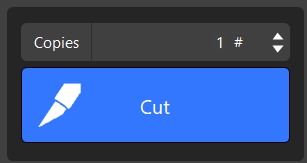
Use the Print button to output the selected job. Using the copies field, you can also quickly adjust the amount of copies of the selected job to be output. This button changes to Cut when a job with cut data has been printed and is in a held state to be cut. These buttons are disabled when no job is selected, and may be hidden depending on if the current operation displays more UI.
Queue Properties and Options
While no job is actively selected, this window displays both the Queue Info and Queue Options.
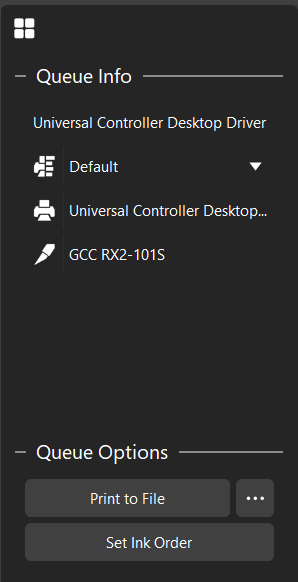
The Queue Info displays the name of the queue, current printmode, and the printing and cutting devices used by the queue. The printmode can be changed by using the dropdown menu.
The Queue Options contains the following:
-
Print to File switch: Toggles the option to print to file. When enabled, this switch is blue in color.
-
Context Menu: Clicking the ellipses will open the Port Settings menu.
-
Set Ink Order: If available, this begins the Ink Order Wizard to assist in setting up new printing devices.
Preview
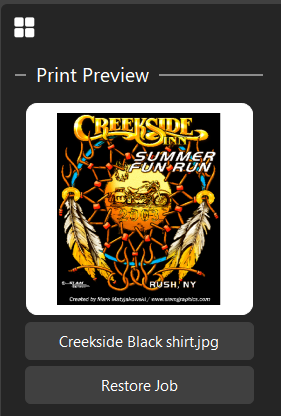
The print preview section displays a preview of the selected job, lists the job name, and provides access to a Restore Job button.
Size, Position, and Options
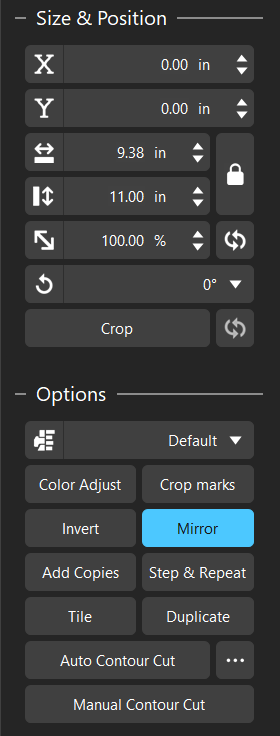
When a job is selected, the Size & Position section and Options section are displayed. Both of these provide quick access to simple job adjustments.
The Size & Position section contains the following controls:
-
X Coordinate: Adjust the X axis positioning of the selected job (Disabled for Auto-Nested jobs).
-
Y Coordinate: Adjust the Y axis positioning of the selected job (Disabled for Auto-Nested jobs).
-
Width Control
-
Height Control
-
Lock Width/Height Ratio
-
Job Scale
-
Reset Scale
-
Job Rotation
-
Crop
-
Reset Crop
The Options section provides access to more in-depth processing options. This section contains the following controls:
-
Printmode Dropdown: Displays the active printmode for the current queue, and provides the ability to change it via the dropdown.
-
Color Adjust: Opens the Easy Color Adjust window.
-
Crop Marks: Adds the default crop marks to the selected job.
-
Invert: Inverts the colors into the negative color space.
-
Mirror: Mirrors the job. Enabled by default for DTF queues.
-
Add Copies.
-
Step & Repeat: Opens the Step & Repeat dialogue.
-
Tile: Open the tiling dialogue. Used for jobs too large for a single print.
-
Duplicate: Duplicates the job a selected number of times. Allows the option of cloning the jobs or creating independent copies.
-
Add Contour Cut.
-
Context Menu: Clicking the ellipses opens the Contour Cut menu.
-
Manual Contour Cut.
Closed Page Options
Within the Closed Page Options section, there are multiple command buttons or job properties that can be easily adjusted:
-
RIP Only: RIPs the job and places it on hold to be released when desired.
-
Print.
-
Cut (if cut data is available).
-
Print and Cut (if cut data is available).
-
Open Page: Opens the Page and Processing options window.
-
Output Copies: Adjust the quantity of copies.
-
Clear Error.
-
View Raw Data.
-
Page Properties: Opens the Job Ticket Properties dialogue window.
En la parte inferior hay tres pestañas: Pestaña Colas, Pestaña de página y Pestaña Trabajo. Estos controles variarán en función de la selección y el dispositivo de salida.
Fiery family of software products
Making your machines run better
Copyright © 2026, Fiery LLC. Todos los derechos reservados. Política de privacidad.