FilmMaker Interface
工作区由以下元素组成。
工具栏控件
从左到右:
- 打开:打开浏览对话框并选择一个图像。任务将被添加到当前队列中。
- 删除任务:永久删除队列中的所选任务。
- 发布任务:发布一项任务,等待打印。
- 暂停任务:停止任务并暂停。
- 使任务假脱机:使打印数据假脱机而不发送到打印机。右键点击可选择查看原始数据的选项。
- 打印任务
- Save As: Save the selected job as a job backup file.
- 中心页面:在材质上水平和垂直居中任务。
- 在页面上水平居中:在材料上水平居中任务。
- 页面顶部居中:将作业水平居中并置于页面顶部。
- 适应页面宽度:缩放任务以匹配页面宽度。
- 适应页面高度:缩放任务以匹配页面高度。
- 适应页面:将任务缩放到页面大小而不超出边界。
- 清除错误:如果发生错误,请点击清除错误。
- 中止任务:停止处理任务。
适用于 TCP/IP 和 USB 设备。 - 启动/停止队列:对于选定的队列,收到作业后立即进行处理 / 无论计划设置如何,都停止所有作业。队列左上角显示的状态。
- 配置队列:对于选定的队列,打开队列属性对话框。
- 打印机状态和设置:查询打印机。
- Printer Readme: Opens the driver's Readme file if available. The button will highlight in red in the event a Readme file is included but has not yet been opened.
- 成本核算:打开队列属性对话框中的成本核算选项卡。
- 查找任务:输入任务名称或条形码以在队列中定位任务(请参阅 条形码支持, 查找任务).
- 任务颜色替换:替换特定颜色或颜色范围(请参阅任务颜色替换)。
-
Create Gang Sheet: Opens the Create Gang Sheet dialogue window (see Gang Sheets).
- 生产标记:打开“队列属性”的“生产标记”选项卡。
- 校准摄像头:点击可打印校准打印并校准摄像机以进行对齐(请参见Visual Print Positioning)。
- Compass:点击以打开上下文相关帮助。
队列
队列是在处理任务之前管理任务的存储库。每个队列均基于一台设备、打印模式和/或介质。
注意:队列可以容纳的最大任务数为2000。

On the top left side of the  ).
).
有关为选定队列配置属性的详细信息,请参见队列属性。

Active Job List
Under the queue tabs, the jobs are shown in a list, with reserved and completed jobs moving out to the Job Reserve List once completed.
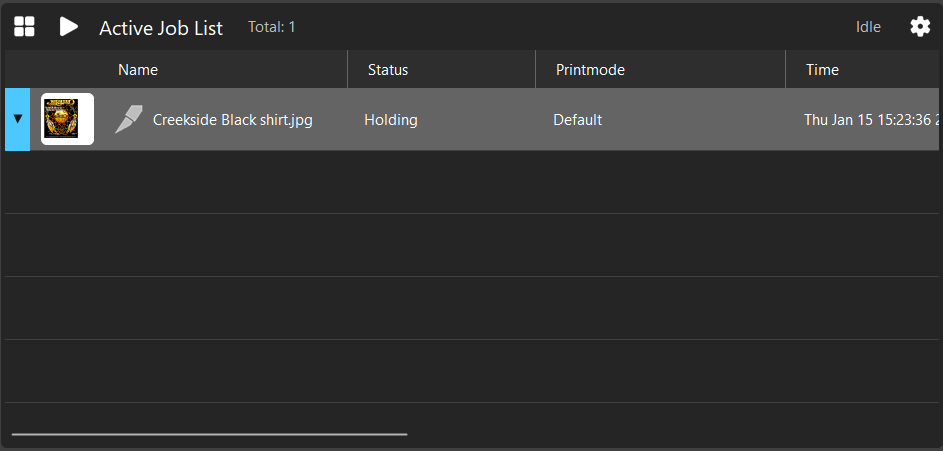
From left to right, the active job menu contains the following controls or information displays:
-
Pane Control button.
-
Run/Pause Queue toggle.
-
Total number of jobs in the active queue.
-
Queue status.
-
Active Job List settings: Open to adjust preview size or to sync headers to match the Job Reserve List.
Job Reserve List
Once jobs are processed, they are moved from the Active Job List to the Job Reserve List.
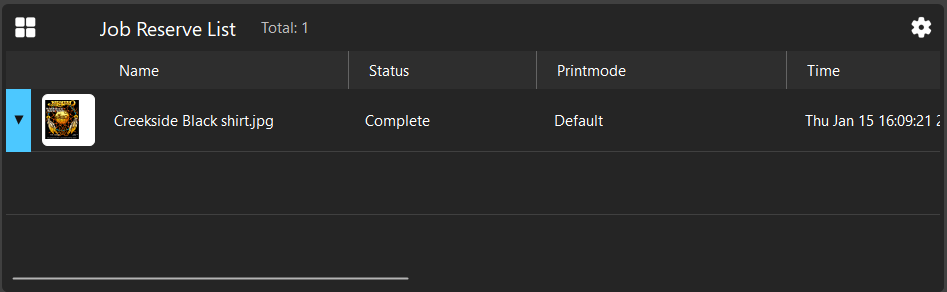
Jobs can be dragged from the Job Reserve List back into the Active Job List should the job need to be redone or extra copies made. This pane also contains:
-
Pane Control Button.
-
Total number of jobs in the reserve list
-
Job Reserve List settings: Open to adjust job preview size or to sync headers to match the Active Job List.
预览管理器
On the top right side of the
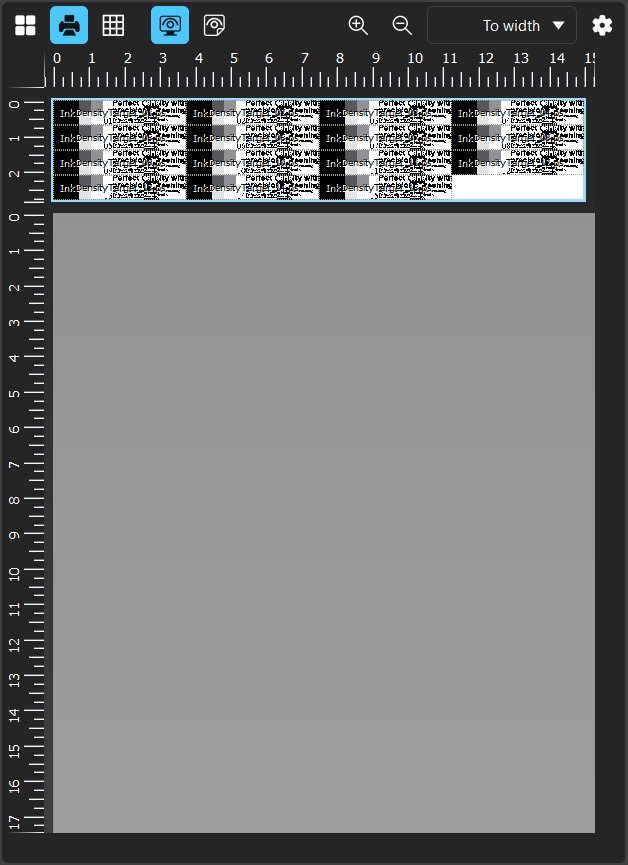
From left to right, the preview window contains the following controls:
-
Pane Control Button.
-
Toggle Print Preview.
-
Toggle grid visibility.
-
Original Preview (Showing matching screen color space).
-
Soft Proofing Preview (Preview more representative of printed output).
-
Zoom In.
-
Zoom Out.
-
Zoom Level Dropdown menu.
-
Additional Preview Settings
Preview & Page Options
The
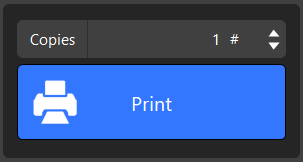
Print and Cut Buttons
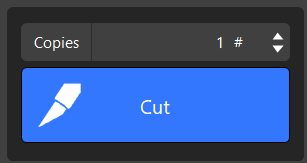
Use the Print button to output the selected job. Using the copies field, you can also quickly adjust the amount of copies of the selected job to be output. This button changes to Cut when a job with cut data has been printed and is in a held state to be cut. These buttons are disabled when no job is selected, and may be hidden depending on if the current operation displays more UI.
Queue Properties and Options
While no job is actively selected, this window displays both the Queue Info and Queue Options.
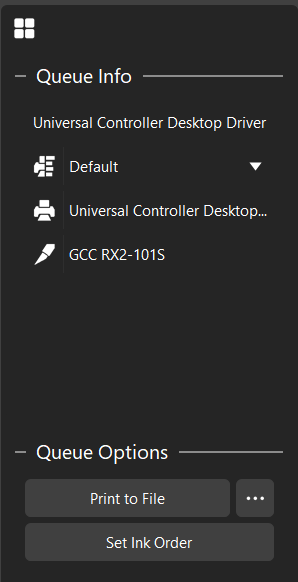
The Queue Info displays the name of the queue, current printmode, and the printing and cutting devices used by the queue. The printmode can be changed by using the dropdown menu.
The Queue Options contains the following:
-
Print to File switch: Toggles the option to print to file. When enabled, this switch is blue in color.
-
Context Menu: Clicking the ellipses will open the Port Settings menu.
-
Set Ink Order: If available, this begins the Ink Order Wizard to assist in setting up new printing devices.
Preview

The print preview section displays a preview of the selected job, lists the job name, and provides access to a Restore Job button.
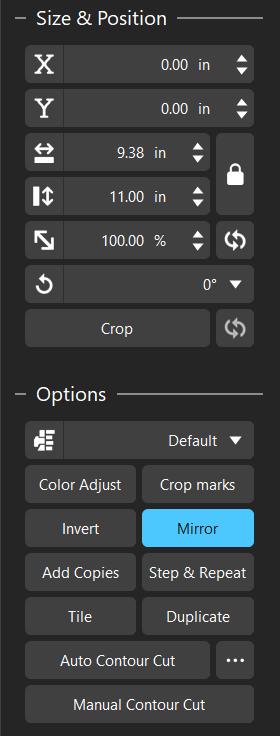
Size, Position, and Options
When a job is selected, the Size & Position section and Options section are displayed. Both of these provide quick access to simple job adjustments.
The Size & Position section contains the following controls:
-
X Coordinate: Adjust the X axis positioning of the selected job (Disabled for Auto-Nested jobs).
-
Y Coordinate: Adjust the Y axis positioning of the selected job (Disabled for Auto-Nested jobs).
-
Width Control
-
Height Control
-
Lock Width/Height Ratio
-
Job Scale
-
Reset Scale
-
Job Rotation
-
Crop
-
Reset Crop
The Options section provides access to more in-depth processing options. This section contains the following controls:
-
Printmode Dropdown: Displays the active printmode for the current queue, and provides the ability to change it via the dropdown.
-
Color Adjust: Opens the Easy Color Adjust window.
-
Crop Marks: Adds the default crop marks to the selected job.
-
Invert: Inverts the colors into the negative color space.
-
Mirror: Mirrors the job. Enabled by default for DTF queues.
-
Add Copies.
-
Step & Repeat: Opens the Step & Repeat dialogue.
-
Tile: Open the tiling dialogue. Used for jobs too large for a single print.
-
Duplicate: Duplicates the job a selected number of times. Allows the option of cloning the jobs or creating independent copies.
-
Add Contour Cut.
-
Context Menu: Clicking the ellipses opens the Contour Cut menu.
-
Manual Contour Cut.
Closed Page Options
Within the Closed Page Options section, there are multiple command buttons or job properties that can be easily adjusted:
-
RIP Only: RIPs the job and places it on hold to be released when desired.
-
Print.
-
Cut (if cut data is available).
-
Print and Cut (if cut data is available).
-
Open Page: Opens the Page and Processing options window.
-
Output Copies: Adjust the quantity of copies.
-
Clear Error.
-
View Raw Data.
-
Page Properties: Opens the Job Ticket Properties dialogue window.
Fiery family of software products
Making your machines run better
版权所有 © 2026, Fiery LLC.保留所有权利。隐私政策。