Beschneiden mit dem Slot-Arbeitspfad
You can use an existing path (HPGL .plt files) as a clipping path for a template.
For example, clipping can create a fixed path for a shoe print.

Erforderlich:
- Dem Slot muss ein Schneidepfad zugewiesen sein.
- Der Job kann einmal beschnitten werden.
- Die Slot-ID kann nicht für mehrere Slots wiederholt werden.
To create a clipping path:
- Create clipping paths using
Note: Scale the path size in the design application before exporting. - Export the paths (HPGL .plt files) and save them in the following folder: C:\Program Name\cutpatterns.
For example: With the shoe template, you could name the clipping path "BlueShoePath_sizeX.plt".
Set up a template:
- Blatt auswählen
- Auf dem Tab Queue die Dropdown-Liste Template wählen und zum Bearbeiten auf die Auslassungspunkte klicken oder Neues Material hinzufügen wählen.
- Ein Template erstellen oder bearbeiten und einen benutzerdefinierten Schneidepfad hinzufügen.
For example: With the shoe template, you could name the template "Blue Shoe size X". - Set the scaling and rotation.
Note: The path is centered in the slot. - Ensure you position the slot for the clipping path using the size and position fields.
- Danach auf Speichern klicken.
So wird ein Job zu beschnitten:
Note: To clip on import, go to Queue > Properties > PDF Setup.
- Ensure the template media you created is selected in the Queue tab.
The clipping path should show in the preview. - Einen Job zur Queue hinzufügen.
Das Dialogfeld „Template-Job importieren“ erscheint. - Einen Import auswählen.
- Adjust the size and position of the graphic.
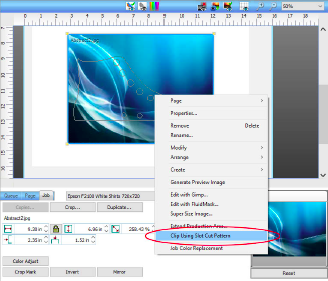
Note: Ensure you are done editing prior to clipping. - In der Vorschau mit der rechten Maustaste auf den Job klicken und Beschneiden mit dem Slot-Arbeitspfad wählen, oder den Job kennzeichnen und Jobs > Beschneiden mit dem Slot-Arbeitspfad wählen.
Der Job wird auf den Schneidepfad zugeschnitten. - Click Print.
Fiery family of software products
Making your machines run better
Copyright 2026 Fiery LLC. Alle Rechte vorbehalten. Datenschutzrichtlinie.