Calibrating a camera
If this button is not available, you must add a camera (see Adding a Camera).
A full camera calibration is necessary every time media is changed, or the camera is moved. Full calibration always requires a calibration print.
Note: Use a white substrate queue for calibration so the image is easy to see.
Part 1: Print a calibration print
A calibration print helps you align the camera view with the platen.
- In the toolbar, click Calibrate Camera.
- In the Camera Calibration dialog, click Step 1: Print a calibration image.
- A calibration print job is added to the selected queue.
Note: This print job can not be modified due to calibration requirements. - Click Print to output the job to a garment or paper.
The output is offset by 1”. - IMPORTANT: Leave the calibration print on the platen for calibration.
Part 2: Camera Positioning
The position of the camera affects the accuracy of alignment. Better positioning improves alignment.
Good camera position

- Square and centered above the platen
- As close to 90-degree angle as possible (calibration lines are horizontal and vertical)
- Equally positioned from, and in equal focus for all calibration points
- Position accuracy is good
Bad camera position

- At an angle and not centered
- Facing slightly the wrong way or leaning, which creates distortion
- Too close to the platen
- Position accuracy is poor
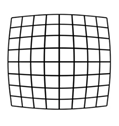
Camera height is very important for accuracy in all areas of the print bed. When taking pictures, you can get Barrel or Pincushion distortion.
Barrel distortion
Pincushion distortion
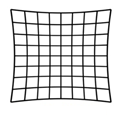
To minimize these effects, use a higher resolution web cam (capable of 1080p) and position the camera so the image of the print area occupies around 60-70% of the total picture area. This will reduce the effect of the distortion.
Part 3: Calibrate the camera
Camera calibration enables you to meticulously place objects to within 1 mm of where you want them to be printed. When calibrating, it is important to see the entire platen (see Part 2: Camera Positioning).
Recommended: To save time with DTG templates, use a fixed sheet or the largest template media. After you perform the calibration, you can use the same media for prints of different sizes as the calibration covers the entire printable area. You can place jobs manually using the camera image.
Note: The Camera Alignment dialog opens full screen and includes zoom functionality to help you accurately place calibration points.
- With the output still on the platen, click Calibrate Camera.
- In the Camera Calibration dialog, click Step 2: Calibrate the camera.
The Position Camera dialog appears. - Move the camera until the entire platen is in view and click Next.
The Camera Calibration dialog appears. - [Optional] Click Update Picture to take a new picture.
- [Optional] Click Camera Position to launch the Camera Position dialog and adjust the focus as needed.
- Select an Accuracy Level using the drop-down. Use the directions in the dialog for target (alignment point) placement and fine-tuning.
Note: Accuracy increases with more targets. - [Optional] Click Reset to reset all calibration points.
- Click Apply and remove the calibration print from the platen.
The camera calibration is complete. The queue preview displays the platen image.
|
Accuracy Level |
Targets |
|---|---|
| 1 | 5 |
| 2 | 9 |
| 3 | 13 |
Fiery family of software products
Making your machines run better
Copyright © 2026, Fiery LLC. All rights reserved. Privacy Policy.