Digital Factory
Interface
L’area di lavoro si compone dei seguenti elementi.
Controlli presenti nella barra degli strumenti

Da sinistra a destra:
- Apri: consente di aprire la finestra di dialogo Sfoglia e selezionare un’immagine. Il lavoro viene aggiunto alla coda corrente.
- Rimuovi lavoro: elimina in modo permanente i lavori selezionati dalla coda.
- Rilascia lavoro: abilita la stampa di un lavoro precedentemente sospeso.
- Sospendi lavoro: interrompe il lavoro e lo mette in pausa.
- Spool lavoro: effettua lo spooling dei dati di stampa senza inviarli alla stampante. Fare clic con il pulsante destro del mouse per visualizzare i dati grezzi.
- Stampa lavoro
- Stampa e taglia lavoro
- Taglia lavoro
- Save As: Save the selected job as a job backup file.
- Centra sulla pagina: centra il lavoro orizzontalmente e verticalmente sul materiale.
- Centra orizzontalmente sulla pagina: centra il lavoro orizzontalmente sul materiale.
- Center at top of page: Center the job horizontally and at the top of the page.
- Adatta alla larghezza della pagina: adatta le dimensioni del lavoro alla larghezza della pagina.
- Adatta all'altezza della pagina: adatta le dimensioni del lavoro all'altezza della pagina.
- Adatta alla pagina: adatta le dimensioni del lavoro alle dimensioni della pagina senza superare i limiti.
- Cancella errori: se si verifica un errore, fare clic qui per cancellarlo.
- Annulla lavori: interrompe l’elaborazione dei lavori.
Works on TCP/IP and USB devices. - Avvia/interrompi coda: per la coda selezionata, elabora i lavori in ordine di ricevimento oppure interrompe tutti i lavori indipendentemente dalle impostazioni di programmazione. Lo stato è mostrato nell’angolo superiore sinistro della coda.
- Avvia/interrompi spooler di taglio: per la coda selezionata, elabora i lavori in ordine di ricevimento oppure interrompe tutti i lavori indipendentemente dalle impostazioni di programmazione.
- Configura coda: per la coda selezionata, apre la finestra di dialogo Proprietà coda.
- Stato e impostazioni stampante: visualizza le informazioni sulla stampante.
- Printer Readme: Opens the driver's Readme file if available. The button will highlight in red in the event a Readme file is included but has not yet been opened.
- Costi: apre la scheda Costi nella finestra di dialogo Proprietà coda.
- Trova lavoro: immettere un nome lavoro o un codice a barre per trovare il lavoro nella coda (vedere Supporto di codici a barre, Ricerca dei lavori).
- Sostituzione colore lavoro: sostituisce un colore specifico o un intervallo di colori (vedere Sostituzione colore lavoro).
-
-
Create Gang Sheet: Opens the Create Gang Sheet dialogue window (see Gang Sheets).
- Preparazione della produzione: apre la scheda Preparazione della produzione di Proprietà coda.
- Calibra fotocamera: fare clic per effettuare una stampa di calibrazione e per calibrare una fotocamera per l’allineamento (vedere Visual Print Positioning).
- Compass: fare clic per aprire la guida contestuale.
- Upgrade Your License: Opens the Upgrade Options dialogue window.
Code
Una coda è una repository che gestisce i lavori prima dell’elaborazione. Ogni coda è basata su una periferica, una modalità di stampa e/o un supporto.
Nota: il numero massimo di lavori che una coda può contenere è 2000.

On the top left side of the  ).
).
Per maggiori informazioni sulla configurazione delle proprietà di una coda selezionata, vedere Proprietà coda.

Active Job List
Under the queue tabs, the jobs are shown in a list, with reserved and completed jobs moving out to the Job Reserve List once completed.

From left to right, the active job menu contains the following controls or information displays:
-
Pane Control button.
-
Run/Pause Queue toggle.
-
Total number of jobs in the active queue.
-
Queue status.
-
Active Job List settings: Open to adjust preview size or to sync headers to match the Job Reserve List.
Job Reserve List
Once jobs are processed, they are moved from the Active Job List to the Job Reserve List.
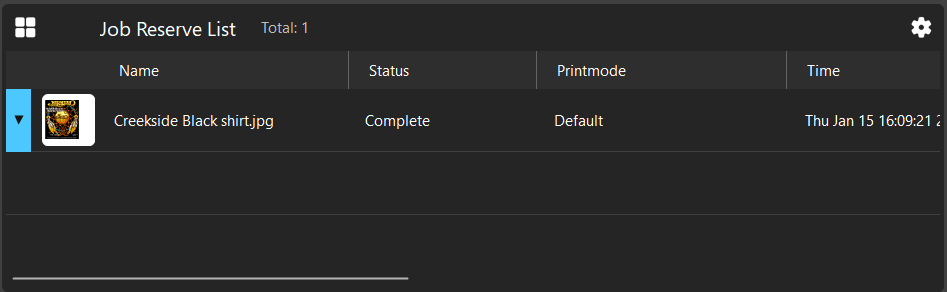
Jobs can be dragged from the Job Reserve List back into the Active Job List should the job need to be redone or extra copies made. This pane also contains:
-
Pane Control Button.
-
Total number of jobs in the reserve list
-
Job Reserve List settings: Open to adjust job preview size or to sync headers to match the Active Job List.
Gestione anteprima
On the top right side of the
From left to right, the preview window contains the following controls:
-
Pane Control Button.
-
Toggle Print Preview.
-
Toggle Cut Preview (If cut data is available).
-
Toggle grid visibility.
-
Toggle job transparency.
-
Expandable context menu with additional options (Soft Proofing Preview, Set Substrate Color, and more).
-
Zoom In.
-
Zoom Out.
-
Zoom Level Dropdown menu.
-
Additional Preview Settings
Preview & Page Options
The
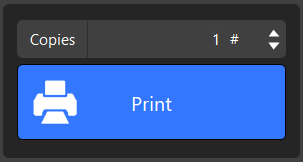
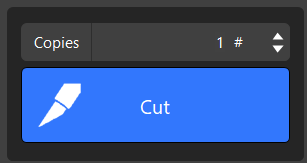
Print and Cut Buttons
Use the Print button to output the selected job. Using the copies field, you can also quickly adjust the amount of copies of the selected job to be output. This button changes to Cut when a job with cut data has been printed and is in a held state to be cut. These buttons are disabled when no job is selected, and may be hidden depending on if the current operation displays more UI.
Queue Properties and Options
While no job is actively selected, this window displays both the Queue Info and Queue Options.
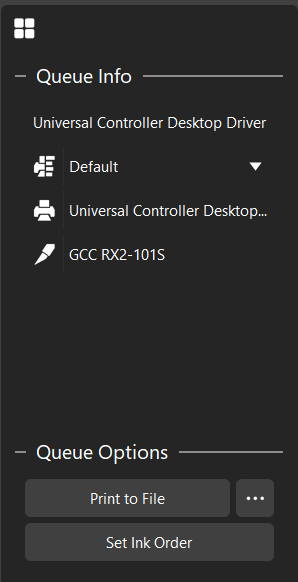
The Queue Info displays the name of the queue, current printmode, and the printing and cutting devices used by the queue. The printmode can be changed by using the dropdown menu.
The Queue Options contains the following:
-
Print to File switch: Toggles the option to print to file. When enabled, this switch is blue in color.
-
Context Menu: Clicking the ellipses will open the Port Settings menu.
-
Set Ink Order: If available, this begins the Ink Order Wizard to assist in setting up new printing devices.
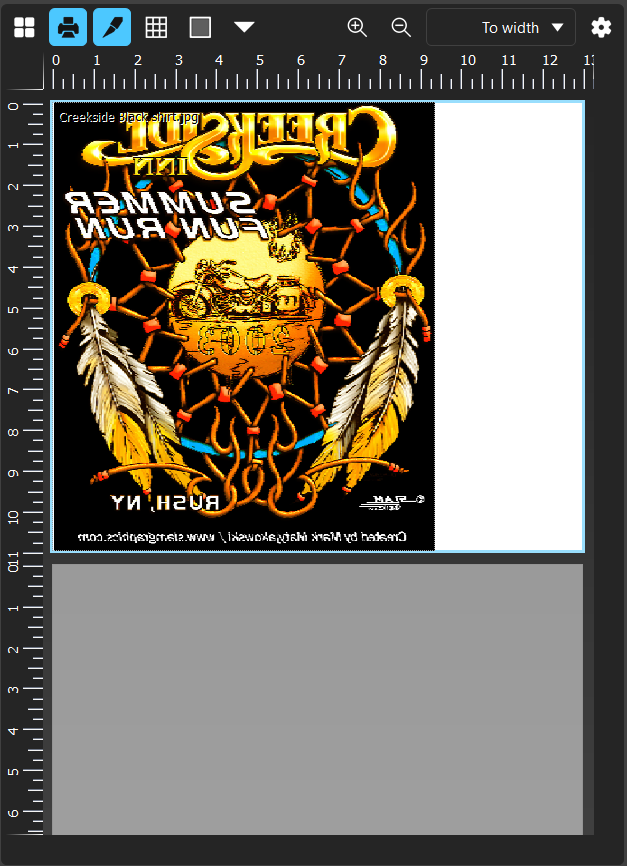
Preview
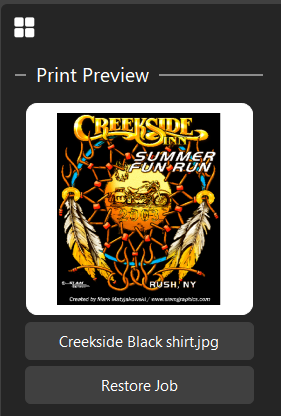
The print preview section displays a preview of the selected job, lists the job name, and provides access to a Restore Job button.
Size, Position, and Options
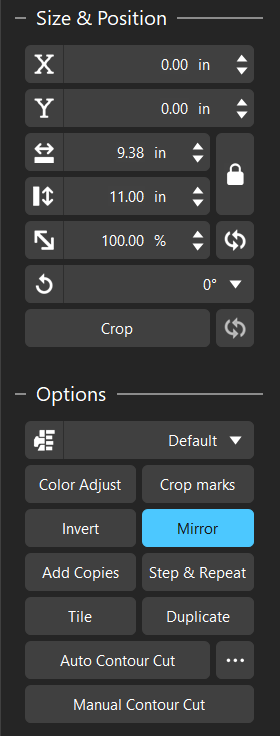
When a job is selected, the Size & Position section and Options section are displayed. Both of these provide quick access to simple job adjustments.
The Size & Position section contains the following controls:
-
X Coordinate: Adjust the X axis positioning of the selected job (Disabled for Auto-Nested jobs).
-
Y Coordinate: Adjust the Y axis positioning of the selected job (Disabled for Auto-Nested jobs).
-
Width Control
-
Height Control
-
Lock Width/Height Ratio
-
Job Scale
-
Reset Scale
-
Job Rotation
-
Crop
-
Reset Crop
The Options section provides access to more in-depth processing options. This section contains the following controls:
-
Printmode Dropdown: Displays the active printmode for the current queue, and provides the ability to change it via the dropdown.
-
Color Adjust: Opens the Easy Color Adjust window.
-
Crop Marks: Adds the default crop marks to the selected job.
-
Invert: Inverts the colors into the negative color space.
-
Mirror: Mirrors the job. Enabled by default for DTF queues.
-
Add Copies.
-
Step & Repeat: Opens the Step & Repeat dialogue.
-
Tile: Open the tiling dialogue. Used for jobs too large for a single print.
-
Duplicate: Duplicates the job a selected number of times. Allows the option of cloning the jobs or creating independent copies.
-
Add Contour Cut.
-
Context Menu: Clicking the ellipses opens the Contour Cut menu.
-
Manual Contour Cut.
Closed Page Options
Within the Closed Page Options section, there are multiple command buttons or job properties that can be easily adjusted:
-
RIP Only: RIPs the job and places it on hold to be released when desired.
-
Print.
-
Cut (if cut data is available).
-
Print and Cut (if cut data is available).
-
Open Page: Opens the Page and Processing options window.
-
Output Copies: Adjust the quantity of copies.
-
Clear Error.
-
View Raw Data.
-
Page Properties: Opens the Job Ticket Properties dialogue window.
Nella parte inferiore sono presenti tre schede: Scheda Coda, Scheda Pagina e Scheda Lavoro. Questi controlli variano a seconda della periferica di produzione e della selezione.
Fiery family of software products
Making your machines run better
Copyright © 2026, Fiery LLC. Tutti i diritti riservati. Informativa sulla protezione dei dati personali.