Note: These materials are offered only in English as supplementary examples for a deeper dive into
Using Actions
Actions enable you to automate sending jobs with specific data encoded to use specific print modes, media sizes/template and slot, print size, and top and left positions. The use of these files overrides queue print mode settings.
If you use the Automatic Job Sorter, with actions, you can set up a single queue to produce multiple jobs with different settings with the help of hot folders.
Actions need to be added to the queue prior to the output job to ensure the file and the job are read together. You can automate the process with AJS. AJS enables to you create actions on the fly.
More below.
There are two kinds of actions, which work differently:
-
-
These actions are based on the information encoded in the job. You create, edit, and delete them. When you apply an action, you select the one you want, and the job will be produced with the created encoding.
-
To enable Actions on job import, go to Queue Properties > Layout Manager and select Show Actions dialog on job import.
-
-
Fiery Actions with the Automatic Job Sorter (AJS)
-
These actions are automatically created based on the file chosen in AJS in the "If" section. When you use AJS, actions allow you to sort and send multiple jobs by name into appropriate queues.
-
You can also use your created actions in AJS. You can select an action (which will show up in the "Then" drop-down list with the name you chose), and this will affect all of the jobs with fitting conditions you add to your selected hot folder while this rule is running.
Job Actions
You can create Actions from a job and apply them to other jobs to override queue settings.
To see the Actions dialog on job import, go to Queue Properties > Layout Manager and select Show Actions dialog on job import.
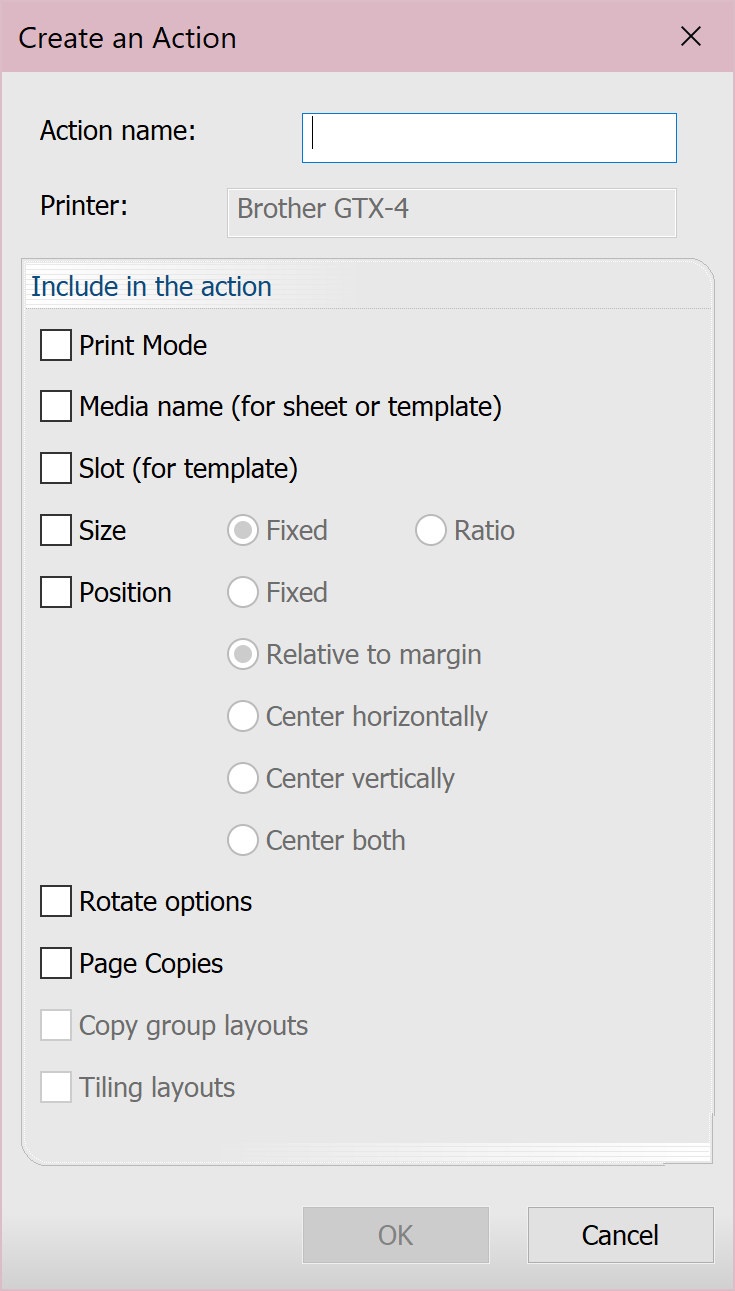
Create an Action
-
Go to Jobs > Actions > Create an Action.
-
Name the action.
-
Select which job settings you want to include.
Note: Most options can be combined, however Copy Groups and Tiling must be used separately.
Note: Copy Groups will fit media size set in the queue if no data exists for rows, columns, or XY spacing. -
Click OK.
The Action is saved to the Actions folder as a .jhdr file.
Apply an Action
-
Go to Jobs > Actions > Apply an Action.
-
Select the action.
-
Click Apply.
Delete an Action
-
Go to Jobs > Actions > Delete an Action.
-
Select the action.
-
Click Delete.
Note: If you plan to use your Actions with the Automatic Job Sorter, you'll need to copy them from the Actions folder (in your program folder) to the AutomaticJobSorter > Actions folder.
Fiery Actions with the Automatic Job Sorter (AJS)
These files are not required but can automate production further. Without setting up more hot folders, you can sort jobs by name into the appropriate queues. Actions allow you to send multiple jobs without setting up as many queues or hot folders.
You can specify things like the print mode and size of the job.
Set up Hot Folders
A hot folder is a specific directory the queue monitors for new design files. When files are added to the hot folder, they are automatically detected and added to the queue as print jobs. Setting up hot folders may require network access for all stations that are part of the output process, depending on your deployment. You’ll also need folders for specific print jobs and queues for automation.
Once you have the folders set up locally or on your network, setting up hot folders can be done in Queue Properties in the Hot Folders tab.
See: Hot Folders
Set up AJS
Go to Tools > Display Automatic Job Sorter.
---
Using Fiery Actions
In this case, the actions are automatically created based on the selected settings of the file chosen in the "IF" condition.
When the rule is active and jobs are placed in the hot folder, they automatically move to the selected queue and be produced with the selected file's settings.
-
Create a new rule.
-
Specify IF: File name (with condition)
-
Specify THEN: Fiery Actions (and assign a queue).
-
Specify THEN: Move File (and assign same queue).
IMPORTANT! The Fiery Actions must be set before other conditions to apply successfully to imported jobs.
---
Using your Actions
Note: Actions are universal but may not work across devices or with all options selected (i.e., templates and page sizes must exist in a driver).
-
Create a new rule.
-
Specify IF: File name (with condition)
-
Specify IF: Action - file name (with condition)
-
Specify THEN: [Select your named action] (and assign a queue).
Note: If you plan to use your Actions with the Automatic Job Sorter, you'll need to copy them from the Actions folder (in your program folder) to the AutomaticJobSorter > Actions folder or they will not appear in the list. -
Specify THEN: Move File (and assign same queue).
IMPORTANT! The Fiery Actions must be set before other conditions to apply successfully to imported jobs.
Let’s walk through an example of using AJS.
Let’s say you are using an e-commerce solution and each file downloads with key words in the file name to describe how the files should be processed. You’re producing t-shirts.
Some useful keywords in this scenario would be:
-
Shirt Color: White, Black, Color
-
Template: Adult, Child, Sleeve, Small, Medium, Large, X-Large
In AJS, you would select the input folder (hot folder), and add rules to move “White”, “Adult” shirts to an Adult Platen queue via hot folder (or however you would like to name them for consistency).
You can also use barcodes as a condition, so when a barcode is scanned, the file is moved.
If you want to incorporate actions, you can use Fiery Actions without creating your own, or create your own, then add the IF, THEN conditions from above.
See also: Job Header Files
Fiery family of software products
Making your machines run better
Copyright © 2026, Fiery LLC. All rights reserved. Privacy Policy.