Note: These materials are offered only in English as supplementary examples for a deeper dive into
CxF Files and Spot Color Matching
CxF Files
CxF is a standard XML format created for the interchange of name spot color matching systems such as spot color palettes.
CxF files can be imported and exported from the queue in System Spots (Devices > Manage Spot Colors) and these tables will be used across all devices.
You can also Import CxF files into Device Spots (Devices > Manage Device Spots) and these will only be used by that specific device and color model (Ink Setup).

With CxF support, you can customize your spot matching on your devices and ensure more consistent color matching on any specific devices and across devices.
Understanding Spot Colors
In PDF and PostScript, there are many types of color space objects. Most are familiar with RGB and CMYK, but with Spot colors (also called separation color space), most users are less familiar and even more so how they work.
Named colors are easy to use (although the processing of these can get complicated).
Spot colors, in all programs, consist of a string (the name of the spot color) and a process color (normally RGB or CMYK).
For example:
-
White (RGB = 255,255,255)
-
My Orange (CMYK = 0, 51, 87, 0)
The spot name (in this case “White” or “My Orange”) allows the RIP to recognize these special color objects and to do something special.
Note: If it doesn’t recognize the name, then it just uses the process color instead (RGB or CMYK values).
If we see “White” and we have a White plane available in the print mode (for example UV or DTG machine), then we put all the White data onto the White color plane (the process color is ignored).
"My Orange" isn’t a real color plane, but we can use the Devices > Manage Spot Colors or Devices > Manage Device Spots and specify the color we want to print.
This document is about spot colors that will be printed as process.
How do you know if a job contains named spot colors?
If you look at the Job Info tip, we display a list of the named colors in the file.

In this case, we have three spot colors.
-
Xmas Gold
-
Xmas Red
-
Xmas Green
Spot colors will appear in the same way, as will all named spot color found in the job.
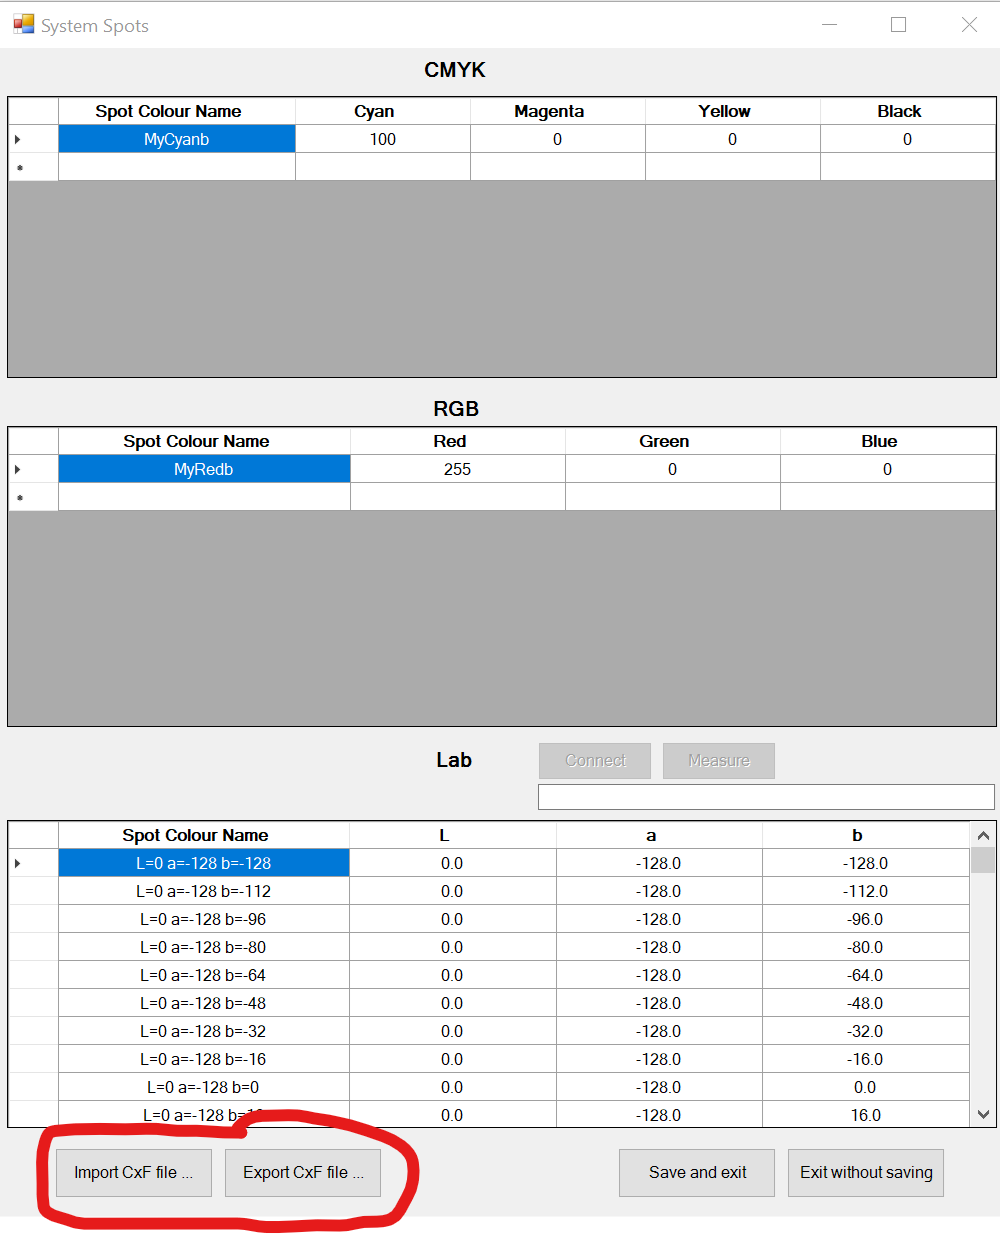
Using spot colors with System Spots
System spot colors are defined as RGB, CMYK or Lab. Lab is recommended as it provides better consistency of color.
System spots are used with all devices and print modes.
All system spots go through the ICC process. RGB will use the RGB input profile. CMYK will use the CMYK input profile. This means you can get different results based on the input profile being used. The advantage of using Lab is there is only one Lab ICC input color space and variation in the color matching is avoided, which can come from the input profile.
An example of setting up System Spots for matching a specific Green and Red would be:
Select Devices > Manage Spot Colors.
We will add Xmas Red as a Lab color.
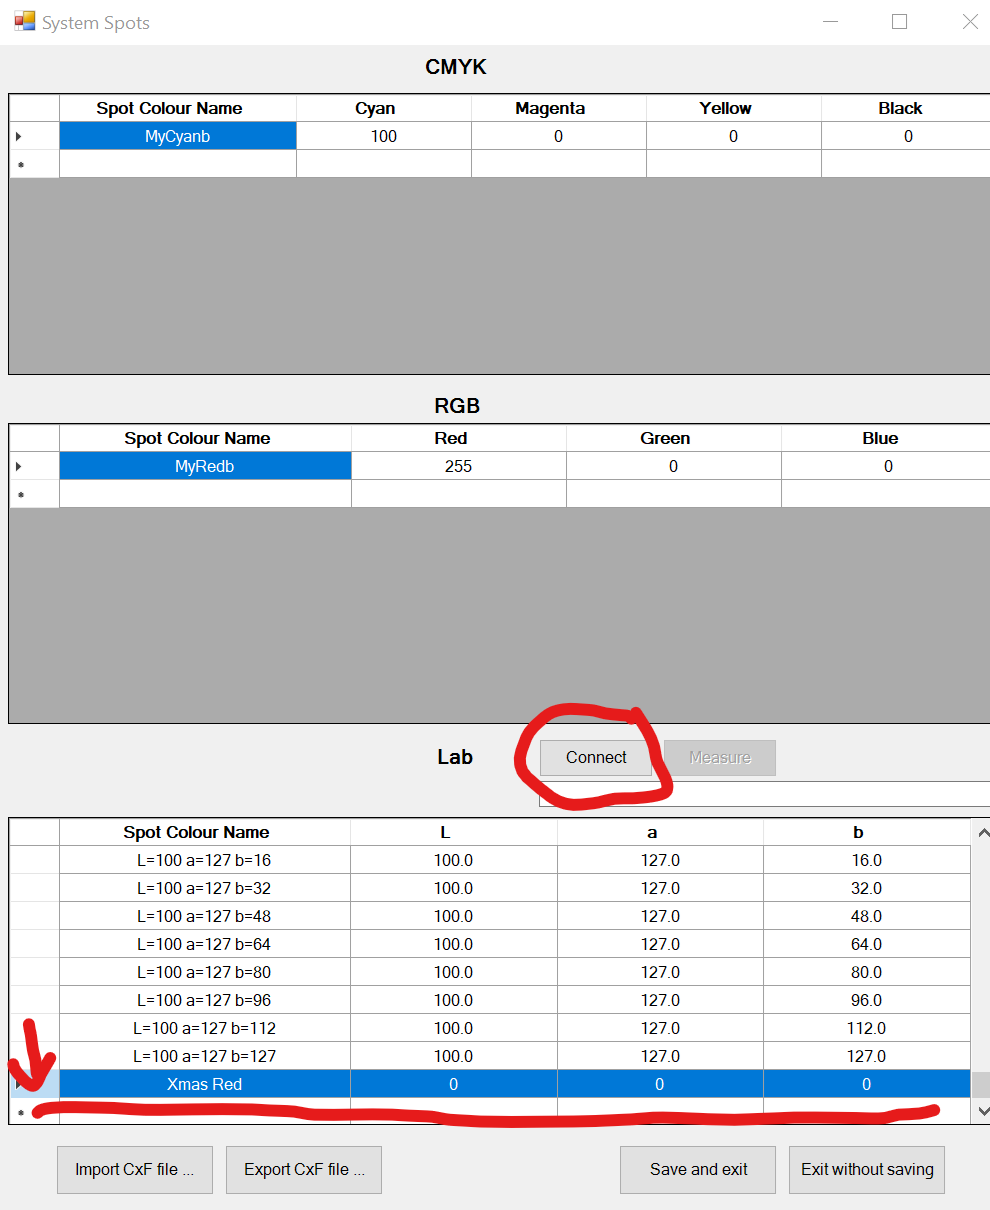
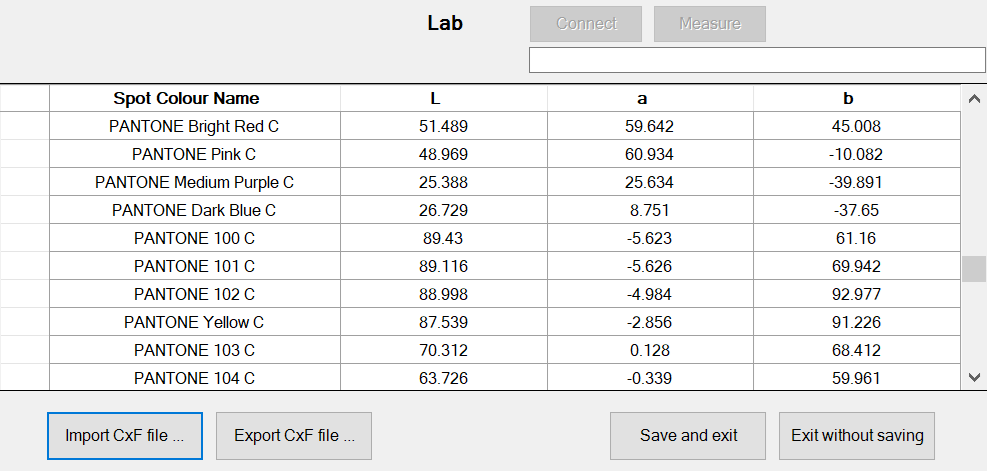
Scroll down to the bottom of the Lab table and type in “Xmas Red” as the spot color name and you can now enter the Lab value of the color you want to match, or you can read the color directly from a Nix, X-Rite I1, or other supported spectrophotometer device.
In this case, I will use the Nix to read the spot color, select the line by clicking to the left of the name and then click Connect.
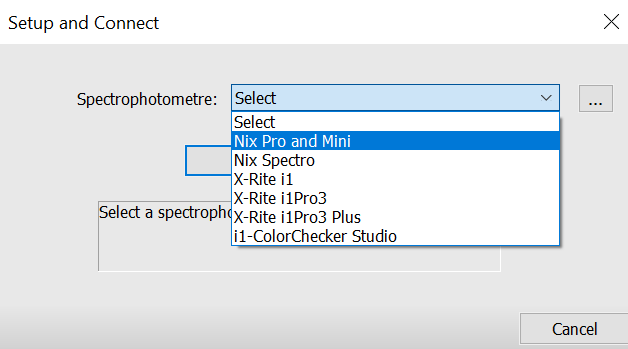
From the drop down spectrophotometer, select your device and then click connect.
Once you establish a successful connection, return to the System Spots, place your device over the color you want to read, and click Measure to read the color.

The Lab colors will be read and will auto-populate the select line.
You can repeat this for additional colors (you only need to connect once).
Every time you use “Xmas Red” and “Xmas Green” in your designs they will now give you the closest match to the read spot colors.
Exporting CxF from System Spots
You can export colors from system spots to use with other software, such as other RIP software.
Select the colors you want to export and click Export CxF file.

Select Lab and Export Selected (to only export the selected colors) and click OK.
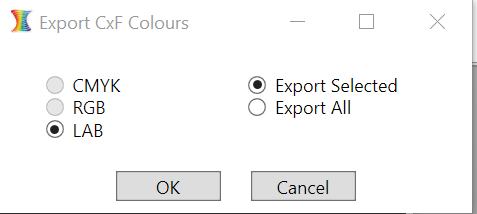
Enter the name of your CxF file, and the location you want to save the file.
You can now import your CxF file into other supporting software.
Importing CxF into System Spots
You can import CxF files like spot color tables into the System spots.
Programs such as ColorLogic ColorAnt can save/export CxF that you can then use in the queue. See CxF Files and Spot Color Matching and Appendix A Using ColorAnt for more information on CxF files from these programs.
In this example, we will set up a spot matching system for Solid Coated but based on the process Fogra equivalent colors (not the actual spot colors).
Many devices can only print a small subset of coated spot colors, these spot colors are designed originally to be printed with each color using a specifically formulated ink, so when printing with CMYK only, you will find lots of colors are not a close color match. Using the Fogra (or another standard) will give you more accurate color matching to that standard, as each spot color is converted to a Lab equivalent that can be printed with CMYK.
See Appendix A and B for how to create this CxF file.
Click Import CxF file and browse and select your CxF file with the spot color data and Lab values you want to use.

CxF files can contain multiple color spaces for each color.
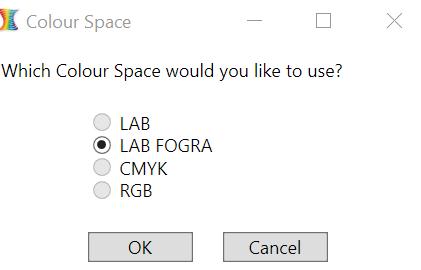
We select Lab Fogra which is the Lab colors for the Fogra39 output and click OK.
All the coated spot colors are loaded using the the Lab colors for Fogra39 printing. Whenever printing coated spot colors, they should be as close a match to the Fogra39 print of these colors as your device can produce.
System spots get applied on all devices and all print modes. So once added, you will have this applied to all your output, giving more consistent and improved color matching on all devices.
Importing CxF files into Device Spots
Before importing the CxF Device spot colors, make sure you have the correct print mode selected in the queue as your default print mode to use for that queue.

Then select Devices > Manage Device Spots.

Click Import CxF file and navigate to the exported CxF file created with the device spot table.
For a table such as spot colors, it make take a few moments to load all the data.
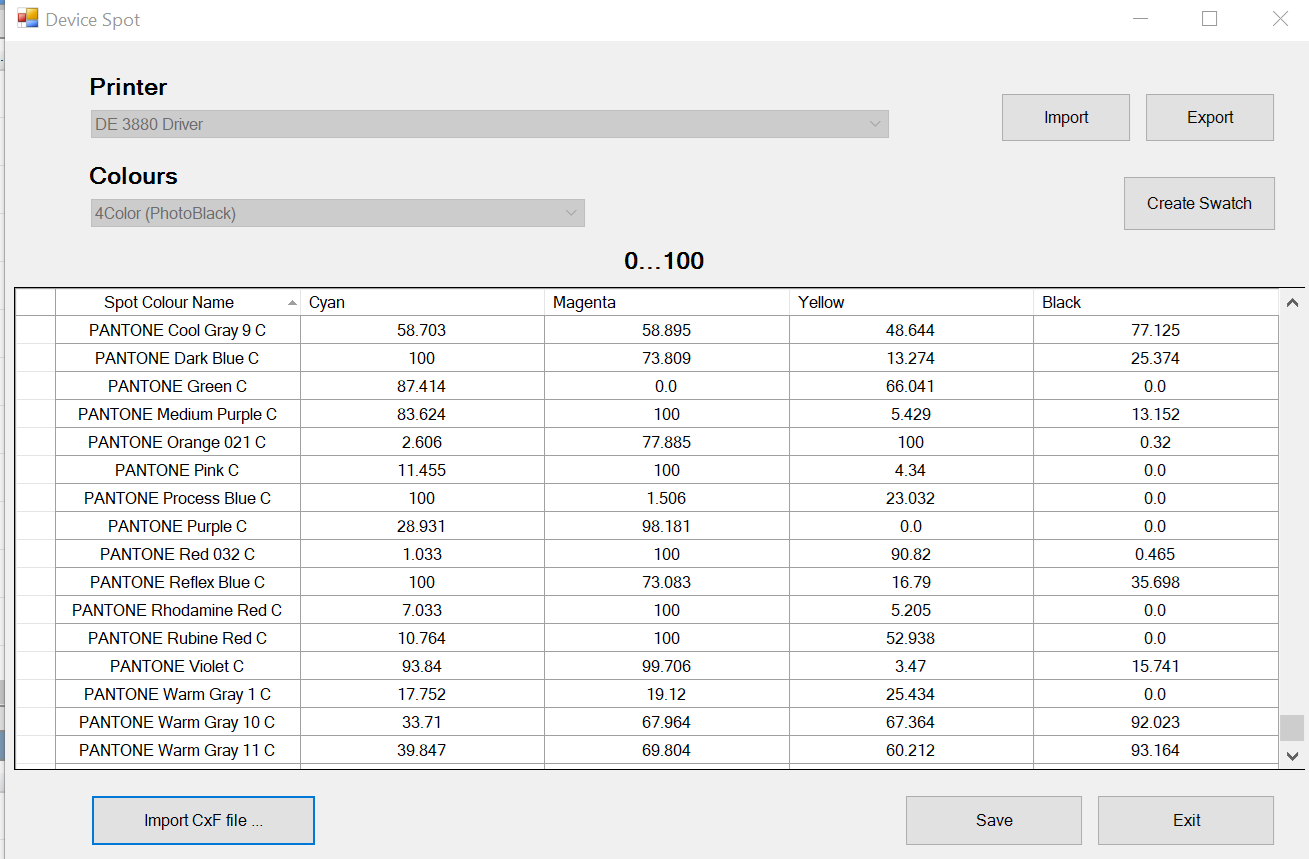
Click Save and then Exit.
Note: This data is saved in the installation directory in \PDF\Resource\SpotDevice\ under the shortname of the driver. It is loaded automatically from this folder when the queue starts.
Device spots for spot colors have some advantages over system spots:
-
They are easier to edit as they work in the device space, and you can print swatches and fine-tune the colors, if required.
-
They give more consistent color when using PDF files that have transparency (or you are using the processing options, such as the Underbase feature in the print mode). See Appendix B Spot Colors and Transparency/Processing Options.
Appendix A Using ColorAnt
ColorAnt from ColorLogic is a tool that can be used to measure and optimize color data.
In this example, we will show how it can be used to import a spot color table and export the data for a the Device space of a CMYKOG printer.
Open ColorAnt and use File Open to open your spot color table. ColorAnt supports a wide range of formats.
We are going to use CxF and open a Solid Coated D50.
Click Color Editor.

In the Profile, from the drop down, select the ICC output profiles you want to use to create the Device Spot table. This only searches the Windows ICC folder, so ensure your ICC is located there.
Click Start to calculate all the colors.
When finished, select File > Save As and set the type to Color Exchange Format (CxF) and set a name.
Your CxF file will be exported and can now be imported into Devices > Manage Device Spots.
As this CxF is CMYK + Orange + Green, it can only be used with a print mode that is set up for processing ICC profiles as CMYK + Orange and Green.
Note: Loading this file for a CMYK device will give incorrect colors.
Appendix B Spot Colors and Transparency/Processing Options
If you are processing a PDF file that contains transparency or using the processing options (such as generating a white underbase or a clear), then the PDF file must be flattened. This is how semi-transparent areas are merged with other colors.
You can tell if a PDF file has transparency by hovering the mouse over the job in list view to see the information dialog.

It displays:
-
Transparency: Yes/No
-
Blending space: Colour space
Check the Job Properties > Processing Options tab to see if the Underbase, Alpha, or Clear generation features are being used. If they are, then all PDF, EPS, PS, and SVG files will be treated as if they have transparency.
When flattening the file as part of the rasterization process, all process color objects (including spot colors) have to be converted to the blending space.
In this case, a spot color must be converted to CMYK or RGB (same as blending space) for the flattening process and then converted to the printer’s color space. We convert the color to the input color space for the flattening to try and keep the color as consistent as possible, but due to different input color spaces and different rendering intents, the spot color will not always print exactly the same.
This is the same as if you print the same image using sRGB and Adobe RGB, it will print different colors.
To get consistent spot colors when using transparency/processing options, use the Device Spots to match the spot colors.
You can create a dedicated spot color device table for your printer using tools such as ColorAnt.
Fiery family of software products
Making your machines run better
Copyright © 2024, Fiery LLC. All rights reserved. Privacy Policy.