Note: These materials are offered only in English as supplementary examples for a deeper dive into
Cutting a Job with Registration Marks
This bonus doc is about cutting with registration marks using the Graphtec FC8000 Series in SignLab v10.
Part I: Perform a test cut
Perform a test cut to verify the current configuration for cutting.
- In SignLab, create an object (for example, a 2 x 2" square).
- Go to Cut > Contour Cut.
- Select all, then go to File > Print and Cut > Select the required Queue, ensure Selected Objects is enabled, and click OK.
- Once imported into VPM, select the job and click Cut.
The output should be cut at the size indicated (2 x 2"). Measure to ensure it is accurate, and if not, go to Part II: Adjust.
Part II: Adjust
The standard resolution is 1016.
To adjust the cutter resolution in VPM, go to Queue > Properties > Cutter > Resolution and set the steps per inch to match the Graphtec.
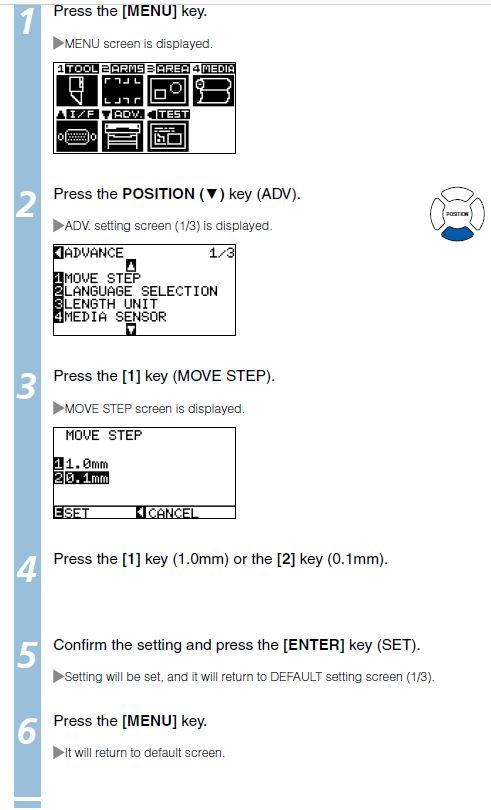
To change the steps per inch in the Graphtec cutter, press Menu > press the down arrow for ADV (Advanced) > press 1 to select Move Step > press 1 key to select the first entry, and press 2 key to enter the second entry, then press Enter to set (see screen shot below).

Part III: Print and cut with registration marks
- In SignLab, create an object (for example, a 2 x 2" square).
- Go to Cut > Contour Cut.
- Select all, then go to File > Print and Cut > Select the required Queue, ensure Selected Objects is enabled, and click OK.
- Once imported into VPM, select the job and click Print and Cut.
- When prompted, using the keys on the cutter, move the knife to the first registration mark (when facing the cutter, LCD on the right, the first registration mark is closest and to the right).
- Press OK.
The job is sent to the cutter.
If the Graphtec cutter is configured with the correct registration (Command) type, all registration marks are scanned, detected, and the cut is performed.
If the Graphtec cutter is not configured properly, you may get a response showing the knife pressing down on the first registration mark, then moving to the home location for the cutter OR if the registration marks are not detected, follow the steps below to set up or confirm the registration type.
How to set up registration (Command)
On the Graphtec, press Menu > 2 (for ARMS SETTING) > press the navigation key to go to the second page (2/4) and press 1 to select the Mark Type, Press 1 for Type 1 and Press 2 for Type 2 registration, then press Enter to set the type.
Once you have confirmed the settings on the Graphtec, repeat steps 3-6. Generally, no settings will need to be changed on the cutter or in VPM. If required, please reference your user manual for the required model of cutter you are using for further details on maintenance.