Supplementary English-Only Training Materials
Note: These materials are offered only in English as supplementary examples for a deeper dive intoFiery LLC products.
Note: These materials are offered only in English as supplementary examples for a deeper dive into
Distressed Effects Continued
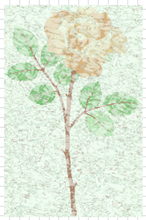
This example shows the Distressed effect filter and the Distressed Frames effect filter. You’ll need a vector graphic (SVG), available in the Clip Art Viewer.
Step One: Distressed Clip Art
- In a new workspace, add some clip art.
- Select all and go to Transform > Render to Bitmap.
- Select the clip art on your workspace, then go to Image > Fiery effects > Distressed.
The Plug-in dialog appears. See table on previous page for help. - Select options in the Plug-in dialog and click OK.
The Distressed dialog appears. - Select effects until you achieve the look you desire and click OK.

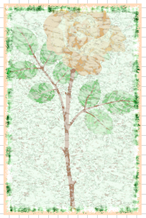
Step Two: Distressed Frames
- With the bitmap selected, go to Image > Fiery effects > Distressed Frames.
- Select the border color and edge tint or click Presets and select a pre-built distressed frame.
- Play with the different effect sliders until you achieve the look you desire and click OK.
Fiery family of software products
Making your machines run better
Copyright © 2025, Fiery LLC. Tutti i diritti riservati. Informativa sulla protezione dei dati personali.